Updated for Blender Version: 2.82
3D printing is an amazing new technology that allows companies, entrepreneurs, or hobbyists to bring their 3D models off the computer and into the real world. Blender has a wide variety of plugins that can be used to improve just about any 3D modeling, animation, or rendering workflow, and 3D printing is no exception. One must-have tool for prepping a model for 3D printing is the 3D-Print Toolbox add-on.
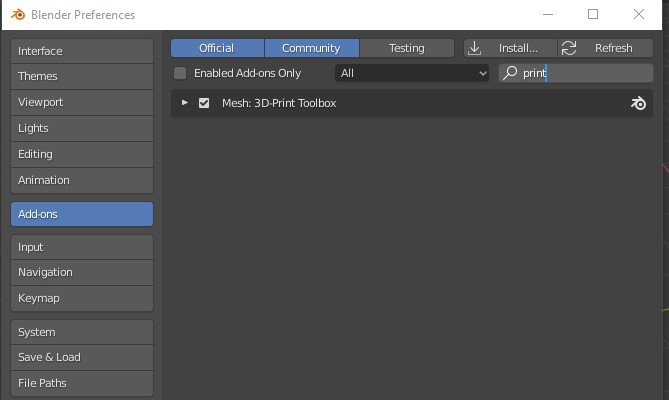
This add-on is included with Blender, but it needs to be turned on to use it. Navigate to Edit > Blender Preferences and click the Add-Ons tab in the left-hand sidebar. Search for “print” to find the 3D-Print Toolbox add on. Click the checkbox to activate it and close that pop-up window.

In the 3D viewport, press the N key to bring up the toolbar on the right side of the panel (if it’s not there already). You will now see a “3D-Print” tab at the bottom of the vertical tabs, right beneath “Create”. This tab now gives you access to a variety of tools and info regarding your model and scene in regards to a 3D print.
Analyze Your Model’s Area and Volume
Under “Statistics” at the top of the tab, there is a button for both Volume and Area, which give the respective values for each in the “Result” box further down that panel. Volume is probably the most important value to keep in mind when 3D printing since it tells you how much material will be used. This impacts the planning either by knowing how much material to buy if you are printing the object yourself or by getting a good idea of the cost of an object if using a service like Shapeways.
Important Pre-Printing Checks
Below the statistics, you’ll see a variety of “checks”. These are different tools used to analyze the object or objects to ensure they are “water-tight” and there are no non-manifold edges.
In 3D terms, a non-manifold edge is a gap in your object. The best way to think of it is “water-tight”. There should be no holes or gaps between the edges on your mesh. Also, since 3D printing requires at least SOME thickness, a flat plane will not be printable either and will show as “non-manifold” in the 3D-Print Toolbox check.
Fixing Non-Manifold Edges
There are a few quick ways to fix non-manifold edges. Depending on your model, making the fix by hand might be fastest. Simply go into edit mode and find the non-matching vertices and merge them. Alternatively, 3D-Print Toolbox has a “Make Manifold” button under the “Clean Up” dropdown.
“Intersections” can also be a good check to do. It counts the number of faces on your object that overlap one another, like this:

These two intersecting cubes have overlapping faces. The inside overlapped parts will not show in the print because the outside faces are what will get printed. This is subjective, since there may be some overlapping when using multiple objects, but it may not be an issue given the model or printing method used.
Below “Intersections” are some finer detailed parameters for more specifics about your mesh. In my opinion, the most useful is the “thickness” check. 3D printing services like Shapeways list out all the specifications for a given material, including the minimum thickness. Use this check to make sure your model falls above the minimum thickness for your desired material.
Scale by Bounds or Volume
Below the “Clean Up” dropdown, the “Transform” dropdown gives a few options for scaling your printable object to either a set Volume or particular Bounds. This is useful if you have a particular object volume in mind.
Exporting Your Object
Last but not least, the most important part of the process is Exporting your finished and checked mesh. 3D-Print Toolbox allows you to pick the export destination folder as well as the file format for the export. There is also an option for Applying the Scale, which applies the world scale to your object. Without it, the units of your scale will be determined by the 3D printing software. For example, 1cm in Blender without the scale applied on export will then be imported into the 3D printing software as “1 unit”.
Along with the scale checkbox, there is an option to Copy Textures. If you have a UV texture on your object, this option will make a duplicate of the texture file or files and copy them to the same output destination folder as your object. From there, packaging up the .zip file for print is easy.
Overall this is an invaluable add-on to have in your Blender tool belt when prepping a model to send to the 3D printer. Any kind of printing – especially 3D printing – is something you want to get right the first time. “Measure twice. Cut once” as the old saying goes. 3D-Print Toolbox will help you make sure you have all your bases covered before you hit that big “Print” button.

